

Button, Label and TextBox Controls
Button:
used for taking acceptance from a user to perform an action.
Label:
used for displaying static text on the UI.
TextBox
used for taking text input from the user, this control can be used in 3 different ways:
The default behavior of the control is single line text; to make it multiline set the property Multiline of the control as true. By default the text area will not have any scroll bars to navigate up and down or left and right, to get them set the ScrollBars property either as Vertial or Horizontal or Both, default is none.
Note: by default the WordWrap property of the control is set as true disabling horizontal scroll bar so set it as false to get horizontal scroll bar.
To use the control as a password field either set the PasswordChar property of control with a character we want to use as Password Character like * or # or $ or @ etc., or else set the UseSystemPasswordChar property as true which indicates the text in the control should appear as the default password character.
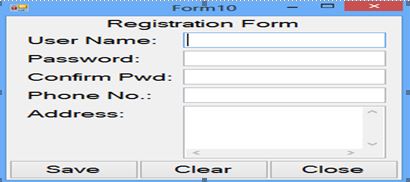
To work with the above 3 controls add a new form in the project, design it as following, set the Name property of the TextBox’s as txtName, txtPwd, txtCPwd, txtPhone and txtAddress and set the Name property of the Button’s as btnSave, btnClear and btnClose.
Setting Tab Order of Form Controls
While working with a windows application we navigate between controls using the Tab key of key board. By default Tab key navigates the focus between controls in the same order how they are placed on form. If we want to set the sequence of tab on our own, it can be done by setting the “Tab Order”. To do this go to View Menu and select Tab Order which shows the current tab order, now click on each control in a sequence how we want to move the tab, again go to view menu and select Tab Order.
In the above form check the following business rules
To perform the first 4 validations first set the enabled property of save button as false so that it will be in disabled state, then set the MaxLength property of both password textbox's to 16 so that they will accept only 16 chars, then define a Validating event procedure for user name textbox and bind that event procedure with both the password textbox's also. Now write the following code under the event procedure:
   TextBox tb = sender as TextBox;
if (tb.Text.Trim().Length == 0) {
	MessageBox.Show("Cannot leave empty.");
	e.Cancel = true;
	return;
}
if (tb.Name != "txtName") {
	if (tb.Text.Trim().Length < 8) {
		MessageBox.Show("Password should be between 8 to 16 chars");
		e.Cancel = true;
		return;
	}
}
if (tb.Name == "txtCPwd") {
	if (txtPwd.Text.Trim() != txtCPwd.Text.Trim()) {
		MessageBox.Show("Confirm password should match with password");
		return;
	}
	btnSave.Enabled = true;
}
txtName.CausesValidation = false;
txtPwd.CausesValidation = false;
txtCPwd.CausesValidation = false;
this.Close();
When we set CausesValidation = false for TextBox it will restrict validating event of the control not to occur so that focus leaves the textbox and form gets closed.
If we want the Phone No TextBox to accept only numeric values and back spaces define a KeyPress event procedure for Phone No TextBox and write following code in it:
    if (char.IsDigit(e.KeyChar) == false && Convert.ToInt32(e.KeyChar) != 8) {
	MessageBox.Show("Enter numerics only");
	e.Handled = true;
}
Code under Save Button Click Event Procedure
MessageBox.Show("Data saved to database");
Code under Clear Button Click Event Procedure
MessageBox.Show("Data saved to database");
Code under Clear Button Click Event Procedure
foreach(Control ctrl in this.Controls) {
	if(ctrl.GetType().Name == "TextBox") {
		TextBox tb = ctrl as TextBox;
		tb.Clear();
	}
}
btnSave.Enabled = false;
txtName.Focus();