

ASP.NET MVC – Scaffolding
ASP.NET Scaffolding is a code generation framework for ASP.NET Web applications. Visual Studio 2013 includes pre-installed code generators for MVC and Web API projects. You add scaffolding to your project when you want to quickly add code that interacts with data models. Using scaffolding can reduce the amount of time to develop standard data operations in your project.
As you have seen that we have created the views for Index, Create, Edit actions and also need to update the actions methods as well. But ASP.Net MVC provides an easier way to create all these Views and action methods using scaffolding.
Let’s take a look at a simple example. We will create the same example which contains a model class Employee, but this time we will use scaffolding.
Step 1 − Open the Visual Studio and click on File → New → Project menu option.
A new Project dialog opens.
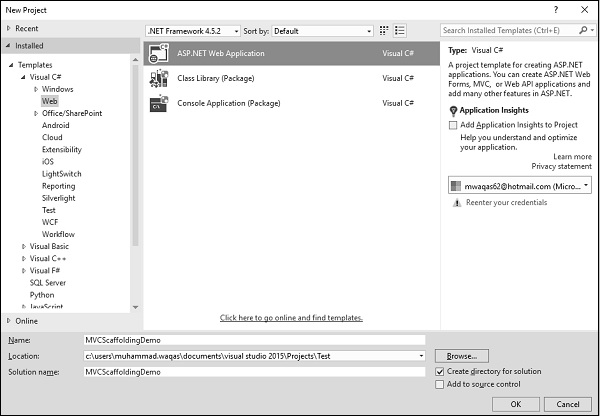
Step 2 − From the left pane, select Templates → Visual C# → Web.
Step 3 − In the middle pane, select ASP.NET Web Application.
Step 4 − Enter the project name ‘MVCScaffoldingDemo’ in the Name field and click Ok to continue. You will see the following dialog which asks you to set the initial content for the ASP.NET project.
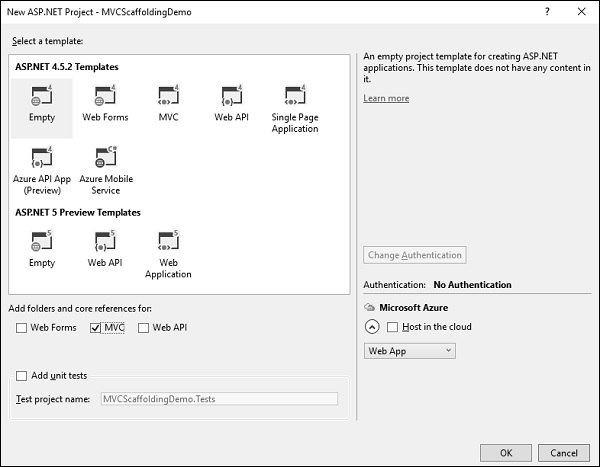
Step 5 − To keep things simple, select the Empty option and check the MVC checkbox in the ‘Add folders and core references for’section and click Ok.
It will create a basic MVC project with minimal predefined content.
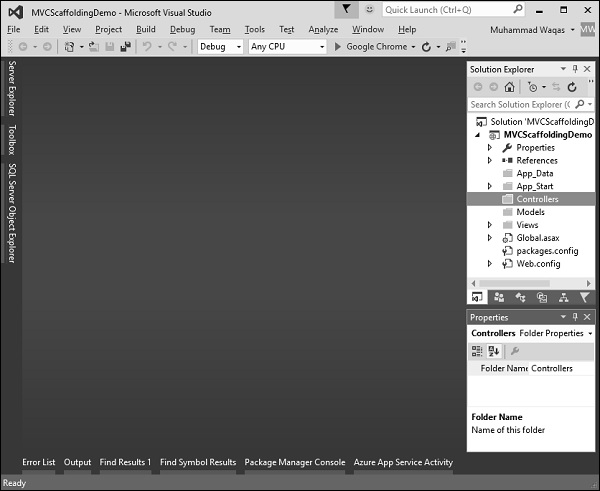
Once the project is created by Visual Studio, you will see a number of files and folders displayed in the Solution Explorer window.
Add Entity Framework Support
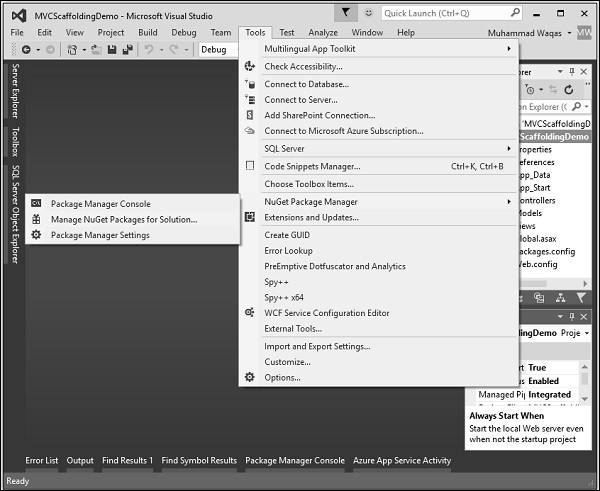
First step is to install the Entity Framework. Right-click on the project and select NuGet Package Manager → Manage NuGet Packages for Solution…
It will open the ‘NuGet Package Manager’. Search for Entity framework in the search box.
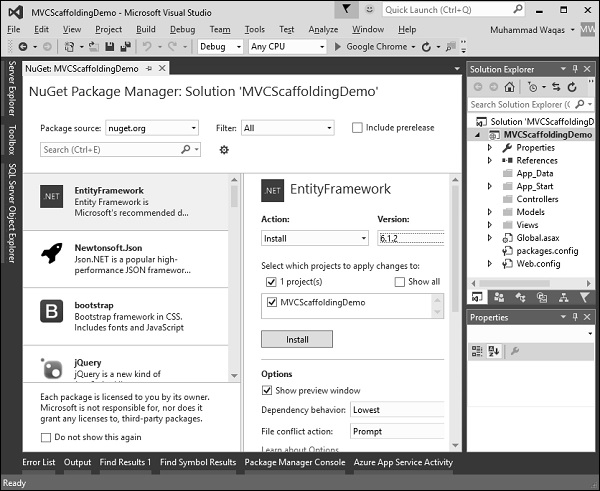
Select the Entity Framework and click ‘Install’ button. It will open the Preview dialog.
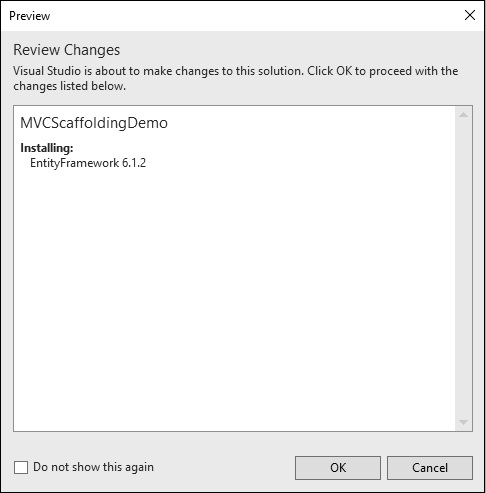
Click Ok to continue.
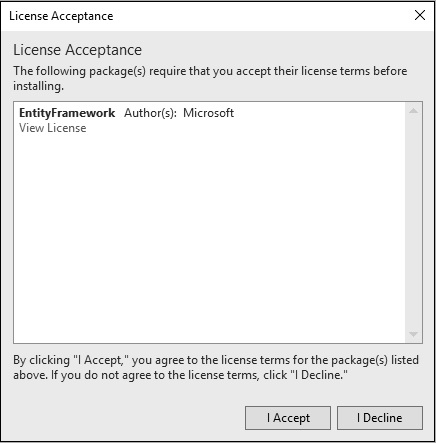
Click ‘I Accept’ button to start installation.
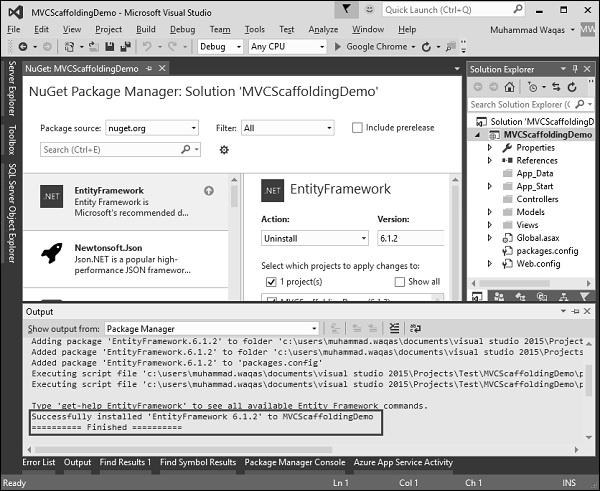
Once the Entity Framework is installed you will see the message in the out window as shown in the above screenshot.
Add Model
To add a model, right-click on the Models folder in the solution explorer and select Add → Class. You will see the ‘Add New Item’ dialog.
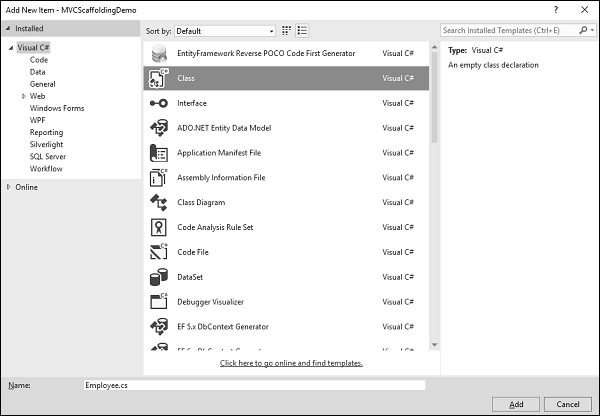
Select Class in the middle pan and enter Employee.cs in the name field.
Add some properties to Employee class using the following code.
using System;

namespace MVCScaffoldingDemo.Models {
   public class Employee{
      public int ID { get; set; }
      public string Name { get; set; }
      public DateTime JoiningDate { get; set; }
      public int Age { get; set; }
   }
}
Add DBContext
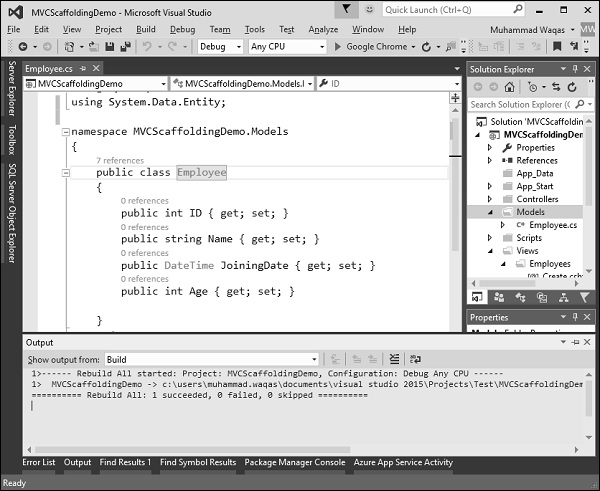
We have an Employee Model, now we need to add another class, which will communicate with Entity Framework to retrieve and save the data. Following is the complete code in Employee.cs file.
using System;
using System.Data.Entity;

namespace MVCScaffoldingDemo.Models{
   public class Employee{
      public int ID { get; set; }
      public string Name { get; set; }
      public DateTime JoiningDate { get; set; }
      public int Age { get; set; }
   }

   public class EmpDBContext : DbContext{
      public DbSet<Employee> Employees { get; set; }
   }
}
As you can see ‘EmpDBContext’ is derived from an EF class known as ‘DbContext’. In this class, we have one property with the name DbSet, which basically represents the entity which you want to query and save.
Now let’s build a solution and you will see the message when the project is successfully build.
Add a Scaffolded Item
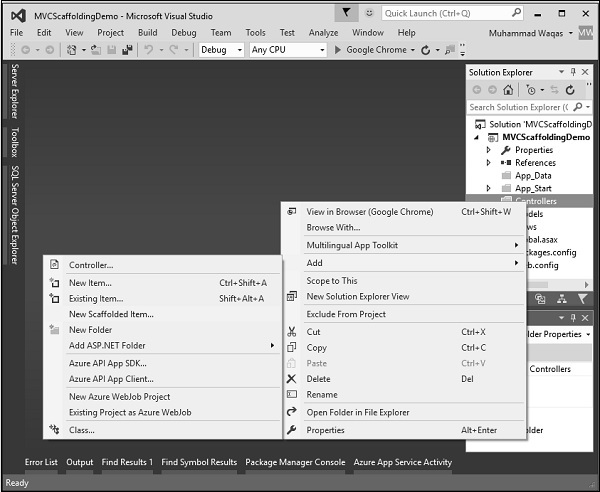
To add a scaffold, right-click on Controllers folder in the Solution Explorer and select Add → New Scaffolded Item.
It will display the Add Scaffold dialog.
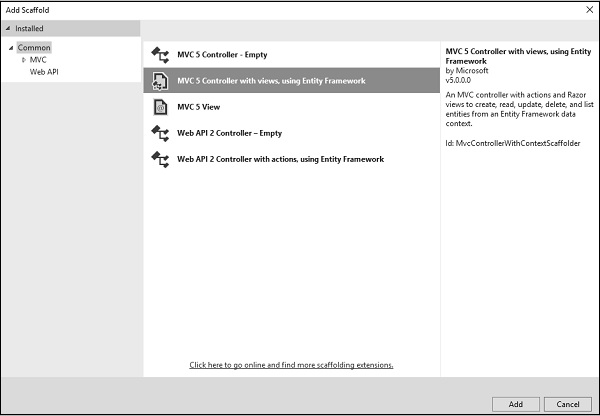
Select MVC 5 Controller with views, using Entity Framework in the middle pane and click ‘Add’ button, which will display the Add Controller dialog.
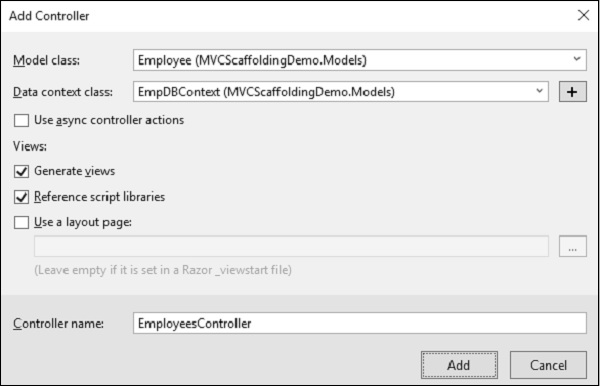
Select Employee from the Model class dropdown and EmpDBContext from the Data context class dropdown. You will also see that the controller name is selected by default.
Click ‘Add’ button to continue and you will see the following code in the EmployeesController, which is created by Visual Studio using Scaffolding.
using System.Data.Entity;
using System.Linq;
using System.Net;
using System.Web.Mvc;
using MVCScaffoldingDemo.Models;

namespace MVCScaffoldingDemo.Controllers {
   public class EmployeesController : Controller{
      private EmpDBContext db = new EmpDBContext();

      // GET: Employees
      public ActionResult Index(){
         return View(db.Employees.ToList());
      }

      // GET: Employees/Details/5
      public ActionResult Details(int? id){
         if (id == null){
            return new HttpStatusCodeResult(HttpStatusCode.BadRequest);
         }

         Employee employee = db.Employees.Find(id);

         if (employee == null){
            return HttpNotFound();
         }
         return View(employee);
      }

      // GET: Employees/Create
      public ActionResult Create(){
         return View();
      }

      // POST: Employees/Create
      // To protect from overposting attacks, please enable the specific
      properties you want to bind to, for
      // more details see http://go.microsoft.com/fwlink/?LinkId=317598.
      [HttpPost]
      [ValidateAntiForgeryToken]

      public ActionResult Create([Bind(Include = "ID,Name,JoiningDate,Age")]
      Employee employee){
         if (ModelState.IsValid){
            db.Employees.Add(employee);
            db.SaveChanges();
            return RedirectToAction("Index");
         }
         return View(employee);
      }

      // GET: Employees/Edit/5
      public ActionResult Edit(int? id){
         if (id == null){
            return new HttpStatusCodeResult(HttpStatusCode.BadRequest);
         }

         Employee employee = db.Employees.Find(id);

         if (employee == null){
            return HttpNotFound();
         }
         return View(employee);
      }

      // POST: Employees/Edit/5
      // To protect from overposting attacks, please enable the specific
      properties you want to bind to, for
      // more details see http://go.microsoft.com/fwlink/?LinkId=317598.
      [HttpPost]
      [ValidateAntiForgeryToken]
      public ActionResult Edit([Bind(Include = "ID,Name,JoiningDate,Age")]Employee employee){
         if (ModelState.IsValid){
            db.Entry(employee).State = EntityState.Modified;
            db.SaveChanges();
            return RedirectToAction("Index");
         }
         return View(employee);
      }

      // GET: Employees/Delete/5
      public ActionResult Delete(int? id){
         if (id == null){
            return new HttpStatusCodeResult(HttpStatusCode.BadRequest);
         }

         Employee employee = db.Employees.Find(id);

         if (employee == null){
            return HttpNotFound();
         }
         return View(employee);
      }

      // POST: Employees/Delete/5
      [HttpPost, ActionName("Delete")]
      [ValidateAntiForgeryToken]

      public ActionResult DeleteConfirmed(int id){
         Employee employee = db.Employees.Find(id);
         db.Employees.Remove(employee);
         db.SaveChanges();
         return RedirectToAction("Index");
      }

      protected override void Dispose(bool disposing){
         if (disposing){
            db.Dispose();
         }

         base.Dispose(disposing);
      }
   }
}
Run your application and specify the following URL http://localhost:59359/employees. You will see the following output.
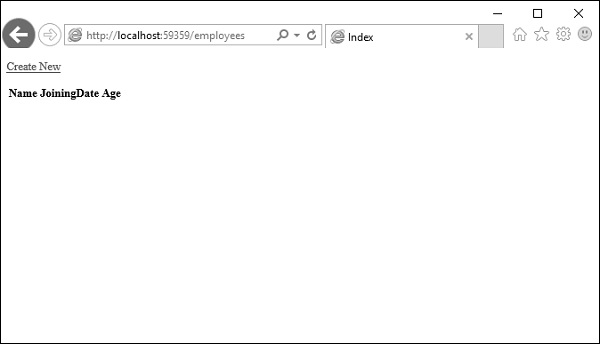
You can see there is no data in the View, because we have not added any records to the database, which is created by Visual Studio.
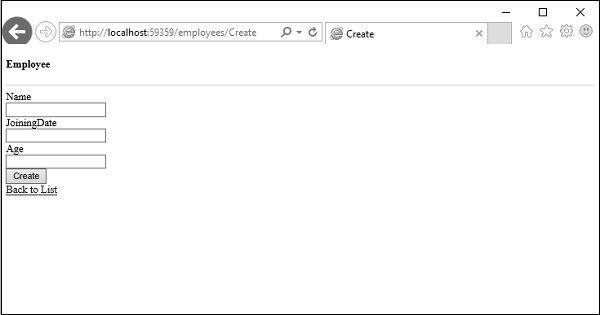
Let’s add one record from the browser by clicking the ‘Create New’ link, it will display the Create view.
Let’s add some data in the following field.
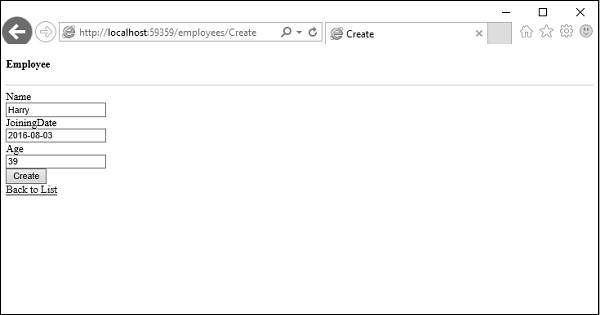
Click the ‘Create’ button and it will update the Index view.
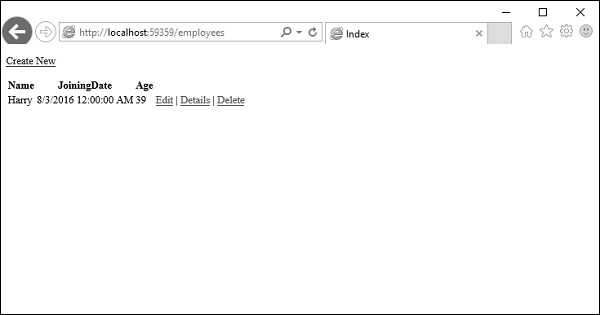
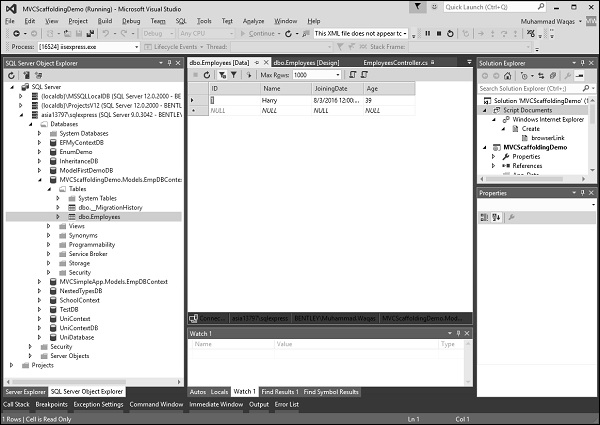
You can see that the new record is also added to the database.
As you can see that we have implemented the same example by using Scaffolding, which is a much easier way to create your Views and Action methods from your model class.