

DataAnnotations is used to configure your model classes, which will highlight the most commonly needed configurations. DataAnnotations are also understood by a number of .NET applications, such as ASP.NET MVC, which allows these applications to leverage the same annotations for client-side validations. DataAnnotation attributes override default Code-First conventions.
System.ComponentModel.DataAnnotations includes the following attributes that impacts the nullability or size of the column.
- Key
- Timestamp
- ConcurrencyCheck
- Required
- MinLength
- MaxLength
- StringLength
System.ComponentModel.DataAnnotations.Schema namespace includes the following attributes that impacts the schema of the database.
- Table
- Column
- Index
- ForeignKey
- NotMapped
- InverseProperty
Key
Entity Framework relies on every entity having a key value that it uses for tracking entities. One of the conventions that Code First depends on is how it implies which property is the key in each of the Code First classes.
The convention is to look for a property named “Id” or one that combines the class name and “Id”, such as “StudentId”. The property will map to a primary key column in the database. The Student, Course and Enrollment classes follow this convention.
Now let’s suppose Student class used the name StdntID instead of ID. When Code First does not find a property that matches this convention it will throw an exception because of Entity Framework’s requirement that you must have a key property.
You can use the key annotation to specify which property is to be used as the EntityKey.
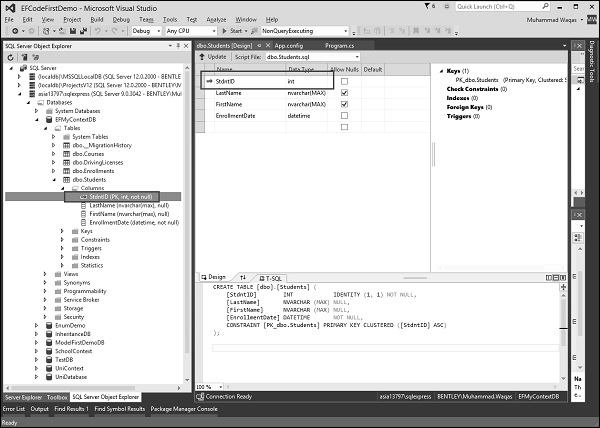
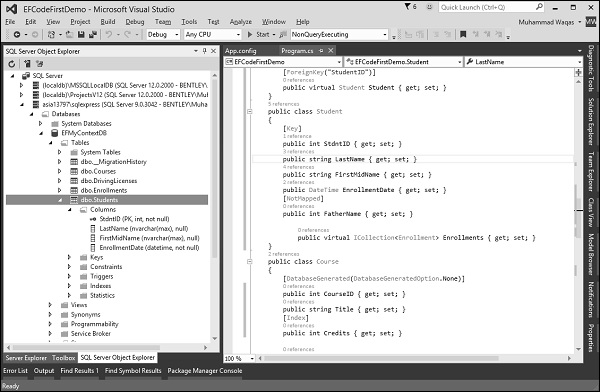
Let’s take a look at the Student class which contains StdntID. It doesn’t follow the default Code First convention so to handle this, Key attribute is added, which will make it a primary key.
public class Student{
   [Key]
   public int StdntID { get; set; }
   public string LastName { get; set; }
   public string FirstMidName { get; set; }
   public DateTime EnrollmentDate { get; set; }

   public virtual ICollection<Enrollment> Enrollments { get; set; }
}
When you run the application and look into the database in SQL Server Explorer, you will see that the primary key is now StdntID in Students table.
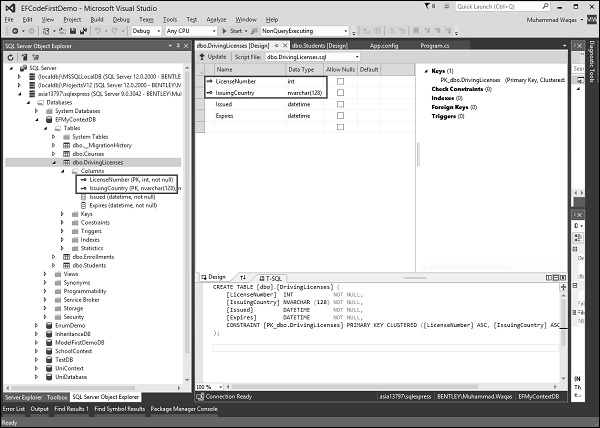
Entity Framework also supports composite keys. Composite keys are primary keys that consist of more than one property. For example, you have a DrivingLicense class whose primary key is a combination of LicenseNumber and IssuingCountry.
public class DrivingLicense{
   [Key, Column(Order = 1)]
   public int LicenseNumber { get; set; }

   [Key, Column(Order = 2)]
   public string IssuingCountry { get; set; }
   public DateTime Issued { get; set; }
   public DateTime Expires { get; set; }
}
When you have composite keys, Entity Framework requires you to define an order of the key properties. You can do this using the Column annotation to specify an order.
Timestamp
Code First will treat Timestamp properties the same as ConcurrencyCheck properties, but it will also ensure that the database field generated by Code First is non-nullable.
It’s more common to use rowversion or timestamp fields for concurrency checking. But rather than using the ConcurrencyCheck annotation, you can use the more specific TimeStamp annotation as long as the type of the property is byte array. You can only have one timestamp property in a given class.
Let’s take a look at a simple example by adding the TimeStamp property to the Course class.
public class Course{
   public int CourseID { get; set; }
   public string Title { get; set; }
   public int Credits { get; set; }
   [Timestamp]
   public byte[] TStamp { get; set; }

   public virtual ICollection<Enrollment> Enrollments { get; set; }
}
As you can see in the above example, Timestamp attribute is applied to Byte[] property of the Course class. So, Code First will create a timestamp column TStamp in the Courses table.
ConcurrencyCheck
The ConcurrencyCheck annotation allows you to flag one or more properties to be used for concurrency checking in the database, when a user edits or deletes an entity. If you’ve been working with the EF Designer, this aligns with setting a property’s ConcurrencyMode to Fixed.
Let’s take a look at a simple example and see how ConcurrencyCheck works by adding it to the Title property in Course class.
public class Course{
   public int CourseID { get; set; }

   [ConcurrencyCheck]
   public string Title { get; set; }
   public int Credits { get; set; }

   [Timestamp, DataType("timestamp")]
   public byte[] TimeStamp { get; set; }

   public virtual ICollection<Enrollment> Enrollments { get; set; }
}
In the above Course class, ConcurrencyCheck attribute is applied to the existing Title property. Code First will include Title column in update command to check for optimistic concurrency as shown in the following code.
exec sp_executesql N'UPDATE [dbo].[Courses]
   SET [Title] = @0
   WHERE (([CourseID] = @1) AND ([Title] = @2))
   ',N'@0 nvarchar(max) ,@1 int,@2 nvarchar(max)
',@0 = N'Maths',@1 = 1,@2 = N'Calculus'
go
Required
The Required annotation tells EF that a particular property is required. Let’s have a look at the following Student class in which Required id is added to the FirstMidName property. Required attribute will force EF to ensure that the property has data in it.
public class Student{
   [Key]
   public int StdntID { get; set; }

   [Required]
   public string LastName { get; set; }

   [Required]
   public string FirstMidName { get; set; }
   public DateTime EnrollmentDate { get; set; }

   public virtual ICollection<Enrollment> Enrollments { get; set; }
}
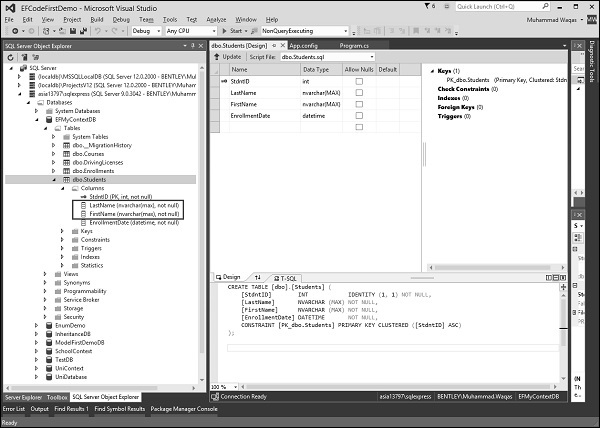
You can see in the above example of Student class Required attribute is applied to FirstMidName and LastName. So, Code First will create a NOT NULL FirstMidName and LastName column in the Students table as shown in the following screenshot.
MaxLength
The MaxLength attribute allows you to specify additional property validations. It can be applied to a string or array type property of a domain class. EF Code First will set the size of a column as specified in MaxLength attribute.
Let’s take a look at the following Course class in which MaxLength(24) attribute is applied to Title property.
public class Course{
   public int CourseID { get; set; }
   [ConcurrencyCheck]
   [MaxLength(24)]

   public string Title { get; set; }
   public int Credits { get; set; }

   public virtual ICollection<Enrollment> Enrollments { get; set; }
}
When you run the above application, Code-First will create a nvarchar(24) column Title in the Coursed table as shown in the following screenshot.

Now when the user sets the Title which contains more than 24 characters, EF will throw EntityValidationError.
MinLength
The MinLength attribute allows you to specify additional property validations, just as you did with MaxLength. MinLength attribute can also be used with MaxLength attribute as shown in the following code.
public class Course{
   public int CourseID { get; set; }
   [ConcurrencyCheck]
   [MaxLength(24) , MinLength(5)]
   public string Title { get; set; }
   public int Credits { get; set; }

   public virtual ICollection<Enrollment> Enrollments { get; set; }
}
EF will throw EntityValidationError, if you set a value of Title property less than the specified length in MinLength attribute or greater than the specified length in MaxLength attribute.
StringLength
StringLength also allows you to specify additional property validations like MaxLength. The difference being StringLength attribute can only be applied to a string type property of Domain classes.
public class Course{
   public int CourseID { get; set; }
   [StringLength (24)]
   public string Title { get; set; }
   public int Credits { get; set; }

   public virtual ICollection<Enrollment> Enrollments { get; set; }
}
Entity Framework also validates the value of a property for StringLength attribute. Now, if the user sets the Title, which contains more than 24 characters, then EF will throw EntityValidationError.
Table
Default Code First convention creates a table name same as the class name. If you are letting Code First create the database, you can also change the name of the tables it is creating. You can use Code First with an existing database. But it’s not always the case that the names of the classes match the names of the tables in your database.
Table attribute overrides this default convention. EF Code First will create a table with a specified name in Table attribute for a given domain class.
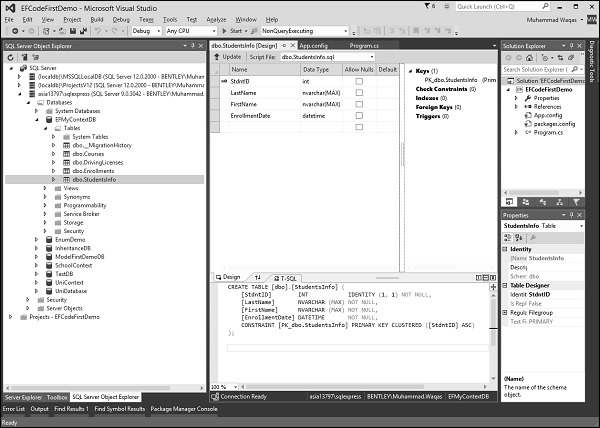
Let’s take a look at an example in which the class is named Student, and by convention, Code First presumes this will map to a table named Students. If that’s not the case you can specify the name of the table with the Table attribute as shown in the following code.
[Table("StudentsInfo")]
public class Student{
   [Key]
   public int StdntID { get; set; }

   [Required]
   public string LastName { get; set; }

   [Required]
   public string FirstMidName { get; set; }
   public DateTime EnrollmentDate { get; set; }

   public virtual ICollection<Enrollment> Enrollments { get; set; }
}
You can now see that the Table attribute specifies the table as StudentsInfo. When the table is generated, you will see the table name StudentsInfo as shown in the following screenshot.
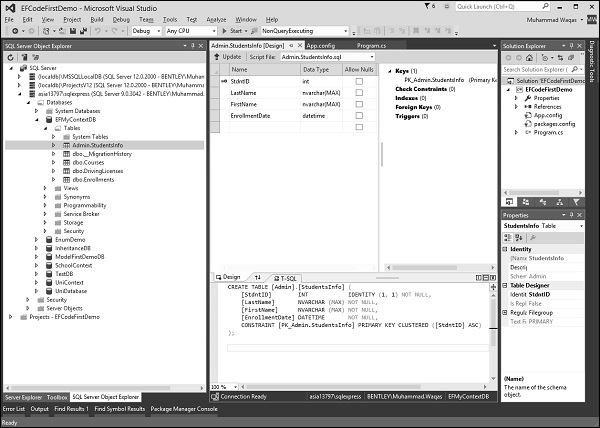
You cannot only specify the table name but you can also specify a schema for the table using the Table attribute using the following code.
[Table("StudentsInfo", Schema = "Admin")]

public class Student{
   [Key]
   public int StdntID { get; set; }

   [Required]
   public string LastName { get; set; }

   [Required]
   public string FirstMidName { get; set; }
   public DateTime EnrollmentDate { get; set; }

   public virtual ICollection<Enrollment> Enrollments { get; set; }
}
In the above example, the table is specified with admin schema. Now Code First will create StudentsInfo table in Admin schema as shown in the following screenshot.
Column
It is also the same as Table attribute, but Table attribute overrides the table behavior while Column attribute overrides the column behavior. Default Code First convention creates a column name same as the property name.
If you are letting Code First create the database, and you also want to change the name of the columns in your tables. Column attribute overrides this default convention. EF Code First will create a column with a specified name in the Column attribute for a given property.
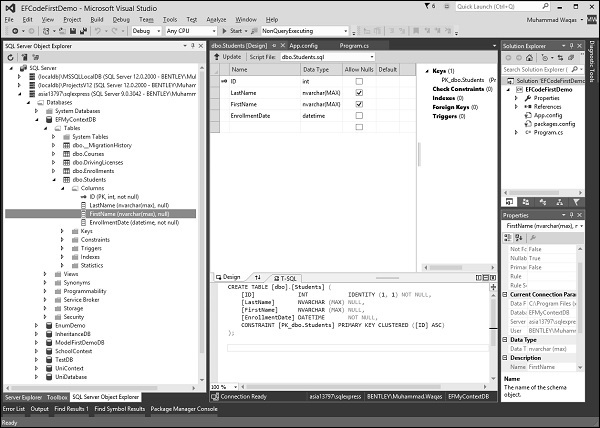
Let’s take a look at the following example again in which the property is named FirstMidName, and by convention, Code First presumes this will map to a column named FirstMidName. If that’s not the case, you can specify the name of the column with the Column attribute as shown in the following code.
public class Student{
   public int ID { get; set; }
   public string LastName { get; set; }

   [Column("FirstName")]
   public string FirstMidName { get; set; }
   public DateTime EnrollmentDate { get; set; }

   public virtual ICollection<Enrollment> Enrollments { get; set; }
}
You can now see that the Column attribute specifies the column as FirstName. When the table is generated, you will see the column name FirstName as shown in the following screenshot.
Index
The Index attribute was introduced in Entity Framework 6.1. Note − If you are using an earlier version, the information in this section does not apply.
You can create an index on one or more columns using the IndexAttribute. Adding the attribute to one or more properties will cause EF to create the corresponding index in the database when it creates the database.
Indexes make the retrieval of data faster and efficient, in most cases. However, overloading a table or view with indexes could unpleasantly affect the performance of other operations such as inserts or updates.
Indexing is the new feature in Entity Framework where you can improve the performance of your Code First application by reducing the time required to query data from the database.
You can add indexes to your database using the Index attribute, and override the default Unique and Clustered settings to get the index best suited to your scenario. By default, the index will be named IX_<property name>
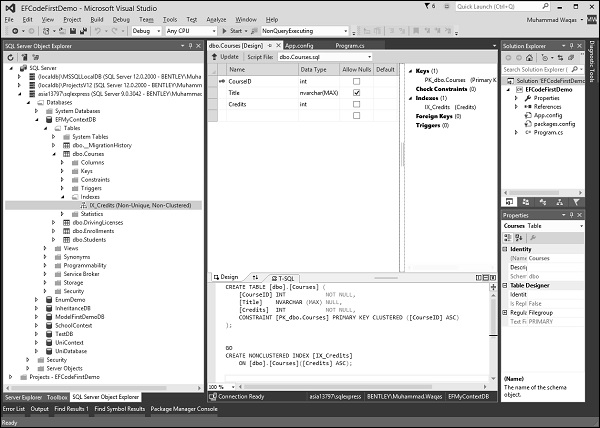
Let’s take a look at the following code in which Index attribute is added in Course class for Credits.
public class Cours{
   public int CourseID { get; set; }
   public string Title { get; set; }
   [Index]
   public int Credits { get; set; }

   public virtual ICollection<Enrollment> Enrollments { get; set; }
}
You can see that the Index attribute is applied to the Credits property. Now when the table is generated, you will see IX_Credits in Indexes.
By default, indexes are non-unique, but you can use the IsUnique named parameter to specify that an index should be unique. The following example introduces a unique index as shown in the following code.
public class Course{
   public int CourseID { get; set; }
   [Index(IsUnique = true)]

   public string Title { get; set; }
   [Index]

   public int Credits { get; set; }

   public virtual ICollection<Enrollment> Enrollments { get; set; }
}
ForeignKey
Code First convention will take care of the most common relationships in your model, but there are some cases where it needs help. For example, by changing the name of the key property in the Student class created a problem with its relationship to Enrollment class.
public class Enrollment{
   public int EnrollmentID { get; set; }
   public int CourseID { get; set; }
   public int StudentID { get; set; }
   public Grade? Grade { get; set; }
   public virtual Course Course { get; set; }
   public virtual Student Student { get; set; }
}

public class Student{
   [Key]
   public int StdntID { get; set; }
   public string LastName { get; set; }
   public string FirstMidName { get; set; }
   public DateTime EnrollmentDate { get; set; }

   public virtual ICollection<Enrollment> Enrollments { get; set; }
}
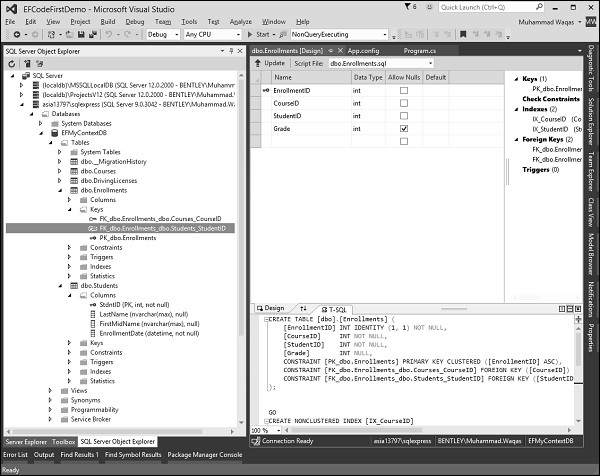
While generating the database, Code First sees the StudentID property in the Enrollment class and recognizes it, by the convention that it matches a class name plus “ID”, as a foreign key to the Student class. But there is no StudentID property in the Student class, rather it is StdntID property in Student class.
The solution for this is to create a navigation property in the Enrollment and use the ForeignKey DataAnnotation to help Code First understand how to build the relationship between the two classes as shown in the following code.
public class Enrollment{
   public int EnrollmentID { get; set; }
   public int CourseID { get; set; }
   public int StudentID { get; set; }
   public Grade? Grade { get; set; }
   public virtual Course Course { get; set; }

   [ForeignKey("StudentID")]
   public virtual Student Student { get; set; }
}
You can see now that the ForeignKey attribute is applied to navigation property.
NotMapped
By default conventions of Code First, every property that is of a supported data type and which includes getters and setters are represented in the database. But this isn’t always the case in applications. NotMapped attribute overrides this default convention. For example, you might have a property in the Student class such as FatherName, but it does not need to be stored. You can apply NotMapped attribute to a FatherName property, which you do not want to create a column in a database. Following is the code.
public class Student{
   [Key]
   public int StdntID { get; set; }
   public string LastName { get; set; }
   public string FirstMidName { get; set; }
   public DateTime EnrollmentDate { get; set; }
   [NotMapped]
   public int FatherName { get; set; }

   public virtual ICollection<Enrollment> Enrollments { get; set; }
}
You can see that NotMapped attribute is applied to the FatherName property. Now when the table is generated, you will see that FatherName column will not be created in a database, but it is present in Student class.
Code First will not create a column for a property which does not have either getters or setters.
InverseProperty
The InverseProperty is used when you have multiple relationships between classes. In the Enrollment class, you may want to keep track of who enrolled a Current Course and who enrolled a Previous Course.
Let’s add two navigation properties for the Enrollment class.
public class Enrollment{
   public int EnrollmentID { get; set; }
   public int CourseID { get; set; }
   public int StudentID { get; set; }
   public Grade? Grade { get; set; }

   public virtual Course CurrCourse { get; set; }
   public virtual Course PrevCourse { get; set; }
   public virtual Student Student { get; set; }
}
Similarly, you’ll also need to add in the Course class referenced by these properties. The Course class has navigation properties back to the Enrollment class, which contains all the current and previous enrollments.
public class Course{
   public int CourseID { get; set; }
   public string Title { get; set; }
   [Index]

   public int Credits { get; set; }
   public virtual ICollection<Enrollment> CurrEnrollments { get; set; }
   public virtual ICollection<Enrollment> PrevEnrollments { get; set; }
}
Code First creates {Class Name}_{Primary Key} foreign key column if the foreign key property is not included in a particular class as shown in the above classes. When the database is generated you will see a number of foreign keys as seen in the following screenshot.
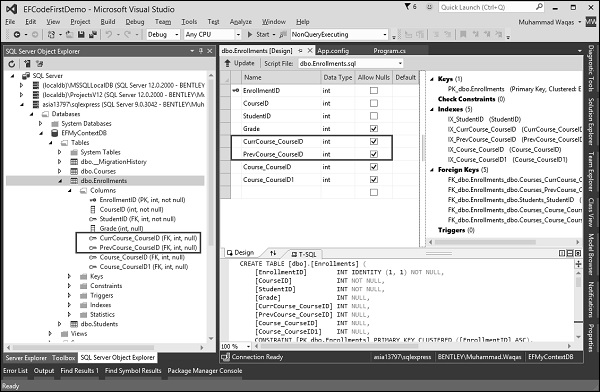
As you can see that Code First is not able to match up the properties in the two classes on its own. The database table for Enrollments should have one foreign key for the CurrCourse and one for the PrevCourse, but Code First will create four foreign key properties, i.e.
- CurrCourse_CourseID
- PrevCourse_CourseID
- Course_CourseID
- Course_CourseID1
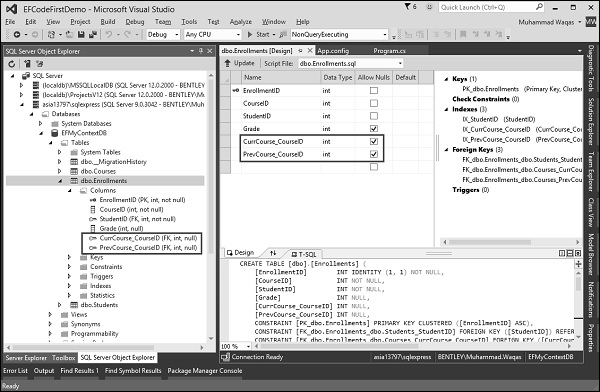
To fix these problems, you can use the InverseProperty annotation to specify the alignment of the properties.
public class Course{
   public int CourseID { get; set; }
   public string Title { get; set; }

   [Index]
   public int Credits { get; set; }

   [InverseProperty("CurrCourse")]
   public virtual ICollection<Enrollment> CurrEnrollments { get; set; }

   [InverseProperty("PrevCourse")]
   public virtual ICollection<Enrollment> PrevEnrollments { get; set; }
}
As you can see now, when InverseProperty attribute is applied in the above Course class by specifying which reference property of Enrollment class it belongs to, Code First will generate database and create only two foreign key columns in Enrollments table as shown in the following screenshot.
We recommend you to execute the above example for better understanding.